
In the previous post we looked at the overview of Azure App Service features. Today we going to look how to used Azure App Service to deploy .NET based workloads using Visual Studio. After Java & Spring, .NET is the second largest language of choice for enterprise development, and Azure will be aggressively marketed to .NET devs by Microsoft. The primary .NET IDE is Visual Studio, and it has many options for direct Azure integration that make developers taking their first dives into the cloud very easy and natural.
I decided to use an existing app called eShopOnWeb provided by Microsoft that is considered a “Monolith” with backend SQL server database. This repo is not targeting azure specifically and is meant as an architectural reference sample of a simple online store. The sources are available on GitHub here: https://github.com/dotnet-architecture/eShopOnWeb. After cloning, opening the app in Visual Studio, building and confirming that app works as intended on my local machine, we’re now ready to put it into the cloud.
First thing we need to do is create a publish profile, which will save all the settings for how we plan on publishing the app going forward. We have the option to do direct publish or setup CI/CD pipeline. For this I went with direct publish profile.
Visual Studio has multiple options for where we want to publish the app, and App Service is one of the targets. If you’ve signed into Visual Studio with your MSDN linked credentials, you’re given clean ability to pick which azure subscription to deploy to, which resource group to attach this app to, and configure the hosting plan. Configuration for hosting plan allows us to define the subscription level and VM type for our app. At this screen you can also create or attach existing database connection. The app name must actually be unique as it reserves a subdomain for your app under *.azurewebsites.net. I’ve added a new database as part of this profile. After clicking create, the process took about a minute to complete. At this point my publish profile is created and displays the summary.
After clicking the site URL, I did not get my application up and running as expected. Instead, I was presented with a generic quick start screen. Further investigation revealed that the app didn’t actually get published, so it was just showing me the default startup page. Publishing the app again have in fact published it.
Visual Studio also has a window called Cloud Explorer, which gives me a lot of view of what I have published in the cloud. The app I just published now started appearing under it. Expanding the app service allowed me to access the application files as they appear on the remote server, the log files, and allowed me to view and start any defined WebJobs associated with the app.
Troubleshooting
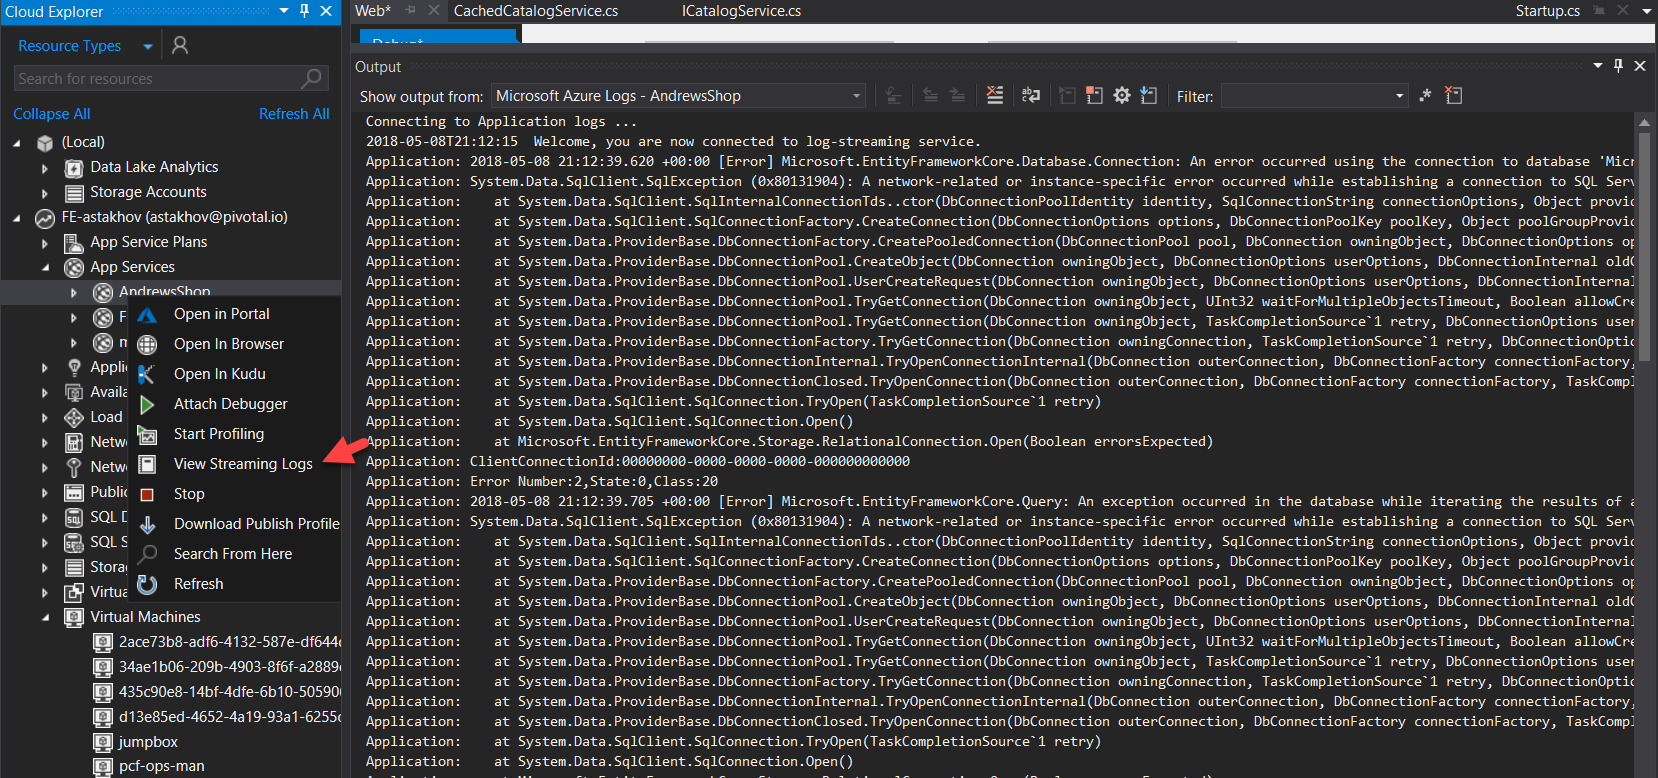 Initial attempts to access the app have yielded about 30 seconds wait time and then a blank screen and no error messages. I wanted to get at the logs. If I right clicked on my app name in Cloud Explorer window, I had a number of interesting options, including “View Streaming Logs”. The output of log tail went into an output window. Refreshing the app yielded gave me the info I was looking for – a misconfigured db connection string.
I was also interested in the other options available for diagnosing my app. Attach Debugger was worked as expected, and I was able to step through my remote code in IDE. I had to disabled code optimizations for the compiled artifacts and republish first (normal thing for debugging .NET project). An interesting option that stuck out was Open in Kudu, which I review later in this article.
Database and Connection Management
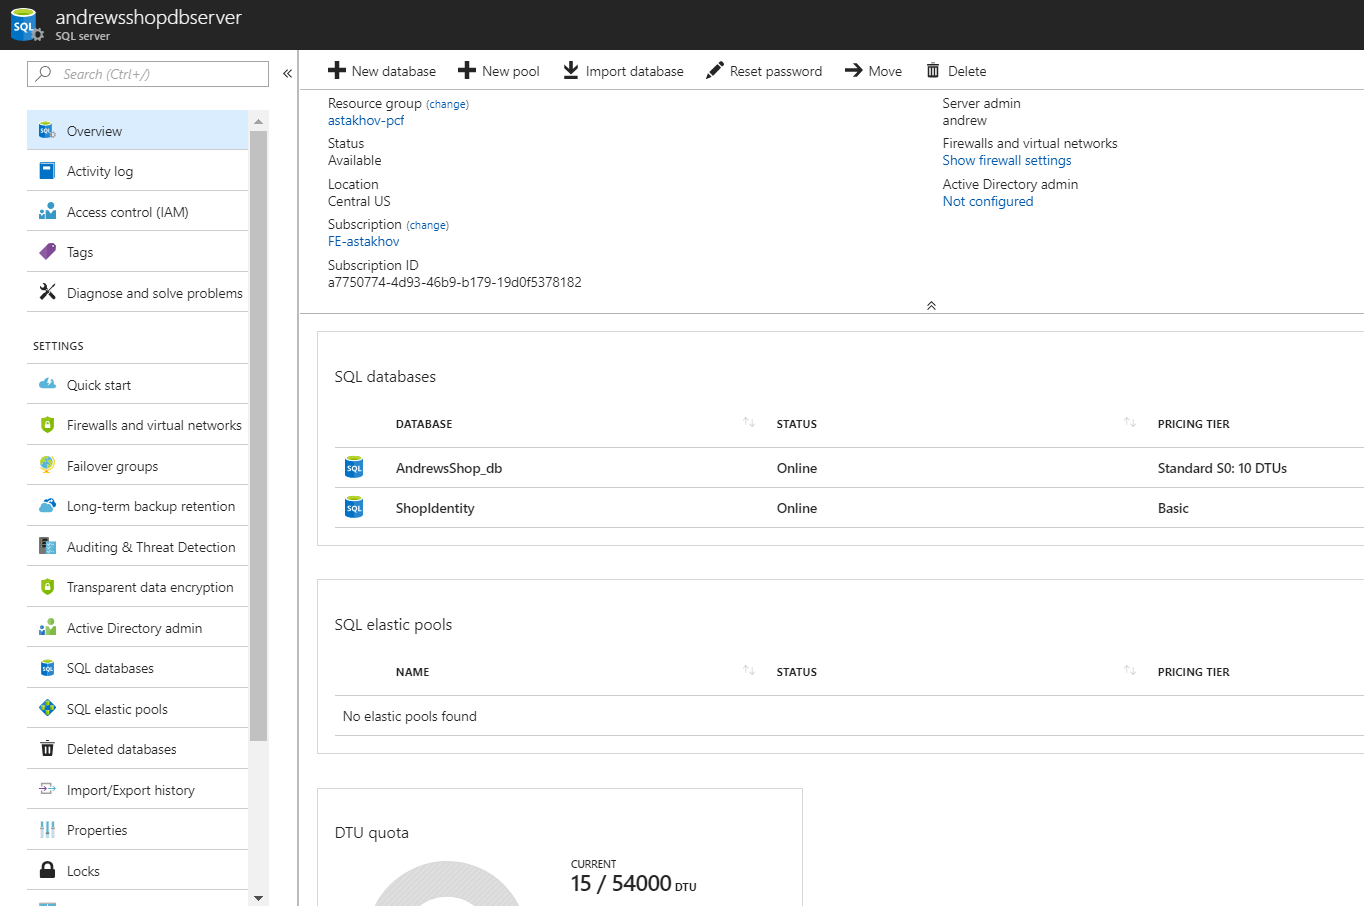 Since my app was still broken due to connection string issues, I needed to fix it. First thing I realized the target app actually requires two databases, and I didn’t find a way to create a second azure db after the initial setup I did earlier. Dropping into azure portal however, I was quickly able to find the the instance of SQL Server that it provisioned for me when I pushed the app. Inside it, it listed the initial database, and also had the option to create a new one. The array of additional options exposed in the portal was also highly impressive.
I was able to grab connection string from the environmental variable of the app, which included what seemed to be a public hostname to access the database. I tried connecting to it directly using SQL Server Management Studio from my machine. I was pleased that the database is actually not publicly accessible without adding a firewall rule to whitelist my IP inside the SQL Server configuration page inside azure portal.
Next I needed to register a second connecting string for my app. Connection strings are managed in application settings inside azure portal as a separate section. Quick reference to the docs indicates that setting connection strings here inject them as environmental variables into your app. Additionally, if it’s a .NET app that defines connection strings in the standard ConnectionStrings block inside config file, it will replace any matching connection string names with those configured in azure. I’ve cloned the original connection string created for me when I first published the app and modified connection string same credentials but different database name. I also made both match the same name that were defined in my app’s appsettings.json file.

 Next issue that was encountered is that database schema hasn’t been created, though it was obvious the connectivity to the database was working. My target application came with EntityFramework for ORM data access with built-in database migration feature, which somehow needed to be applied to my empty databases. The answer came inside Visual Studio application publish screen, which exposed a Settings option. This went through discovery phase of finding all my connection strings and game the option to remap connection strings and run EF migrations when I publish the app. I was really impressed with this because it actually analyzed my codebase to discover that I had migration enabled for my repositories.
After publishing again, my app was actually up and running as expected.