
As more and more companies are embracing container-based infrastructure workflows, I often find myself getting pulled into conversations on how to deal with “heritage” .NET Framework applications. Let’s take a look at what it takes to put your most common workload types into a container.
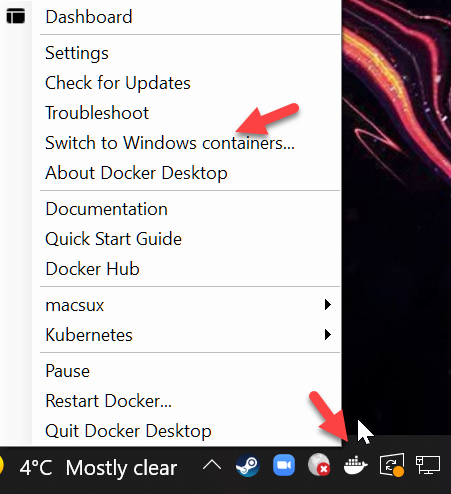
You’ll need Docker Desktop installed running in Windows container mode. If you’re running a Mac or Linux, you’re going to have to move over to the dark side with me and use Windows, as it’s a hard requirement to be able to make Windows-based container images, which is what .NET Framework requires.
Containers 101
Let’s briefly overview how Docker works – if you already know this you can skip ahead. A docker image is a “cake” of layers, made up of files on disk + registry entries (if it’s a Windows container). Each layer represents the delta from the layer that came above it. At the very top of this cake is the base operating system. At the very bottom of this cake, is usually your application bits and commands to start it.
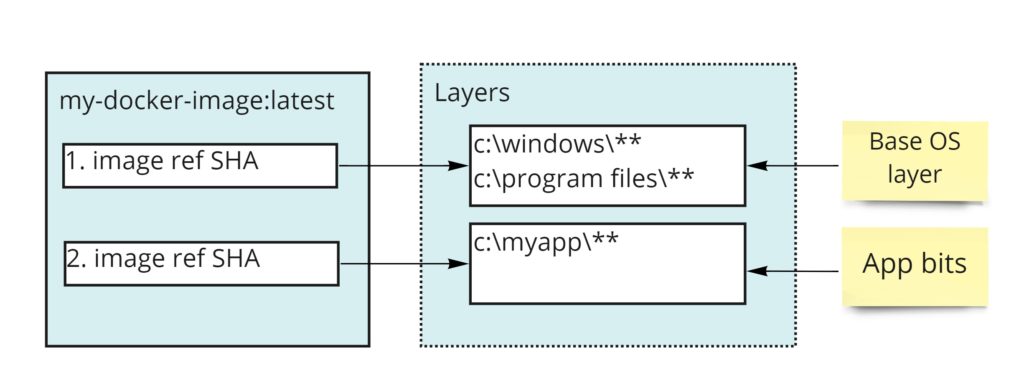
When we ask the container to start, each layer gets overlaid on the host machine. In essence, a container image is a collection of filesystem and registry changes applied to the base operating system to bring it into the desired state, and run it without affecting the host operating system.
So how do we build an image and its layers? In Docker, this is done via a Dockerfile. A dockerfile is made up of commands we execute. After each command, the resulting changes to filesystem and registry and extracted and stored as a distinct layer, that goes into the makeup of the final image.
A typical dockerfile may look like this:
# Indicates that the windowsservercore image will be used as the base image.
FROM mcr.microsoft.com/windows/servercore:ltsc2019

# Uses dism.exe to install the IIS role.
RUN dism.exe /online /enable-feature /all /featurename:iis-webserver /NoRestart

# Copy everything from current folder on the host into target folder in container
COPY . c:\inetpub\wwwroot\

# Sets a command or process that will run each time a container is run from the new image.
CMD [ "cmd" ]
A dockerfile is typically placed into a folder that will act as docker context. Docker context is the root folder on the host operating system from which we want to take files and put them into the container. When you initiate a build operation, this entire folder is going to be copied over into a temporary docker context, therefore it’s important to keep its size small; otherwise, your builds are going to take forever.
Converting code into image
For a typical .NET project, we want to start by creating a dockerfile. The first question is where do we place it. There are a few options
- Option 1: Place it next to
.csprojof the project that is going to be containerized- Pros: intuitive and easy to find
- Cons: if the project references any other projects needed for compilation (like ../CommonProject/common.csproj), the docker context will not have this dependency and our compilation will fail. We could however write the docker file with the assumption that the context will be something OTHER then where dockerfile lives. If we do this however, an extra argument needs to be passed to the
docker buildcommand to set the context, and whoever is building the image needs to know what the correct context is. If you do this, at least put a comment at top of your Dockerfile something like#compile with 'docker build -t mytag ../'to inform others on how to properly use the dockerfile.
- Option 2: Place it at the solution level
- Pros: docker context is usually correct and will have all the necessary dependencies the projects in solution necessary to compile app
- Cons: if more then one project in solution need to be turned into docker image, the default
Dockerfilefilename is no longer an option, and you’ll have to pass it explicitly to thedocker buildcommand via-f <DOCKERFILE>argument.
My recommendation is to go with option 2. It’s the most intuitive for people not familiar with your project structure. For the rest of the article, we’re going to assume your solution is structured with Dockerfiles sitting next to your .sln file and each project is its own subfolder.
What to put into Dockerfile to build .NET Framework webapp
First, let’s discuss our plan of attack.
- Start with the necessary base image with all tooling needed to compile .NET Framework app
- Copy in our app bits into this compilation container
- Invoke the necessary compilation commands
- Create a new image that only has .NET Framework runtime & IIS
- Move compilation bits into the IIS root folder
On surface this look easy. However, if you’ve ever built a stand-alone build agent for any CI/CD server you know that step #1 is a lot more complex than it sounds. Beyond having .NET Framework installed, you generally need:
- Visual studio build tools
- Nuget cli
- .NET Framework targeting packs
- ASP.NET Web targets
But today we’re in luck because Microsoft provides a base .NET Framework SDK image that is packed with all the stuff you need to do all that. With that hassle out of the way, a typical Dockerfile to containerize ASP.NET Framework app may looks like this:
# start with a base image with all the necessary tooling to compile our app
FROM mcr.microsoft.com/dotnet/framework/sdk:4.8 AS build
# set the working directory inside compilation container to c:\app
WORKDIR /app

# copy everything from solution dir into the c:\app
COPY . .
# restore nuget packages
RUN nuget restore
# use msbuild to publish project in /FramworkApp folder to c:\publish, which includes only binaries and content files (no sources)
RUN msbuild "FrameworkApp\FrameworkApp.csproj" /p:DeployOnBuild=true /p:PublishUrl="c:\publish" /p:WebPublishMethod=FileSystem /p:DeployDefaultTarget=WebPublish

# start with new base image for running asp.net apps (which contains IIS)
FROM mcr.microsoft.com/dotnet/framework/aspnet:4.8 AS runtime
# set default work folder to c:\inetpub\wwwroot (IIS root)
WORKDIR /inetpub/wwwroot
# copy files from bin/publish in our sdk container into c:\inetpub\wwwroot
COPY --from=build /publish. ./
The mcr.microsoft.com/dotnet/framework/aspnet image is already configured to startup IIS on port 80 when launched so now additional steps are needed beyond placing our files in the correct folder. Save this as Myproject.dockerfile next to the solution
Compiling image
Now we just need to compile our image. Open up a command prompt and change the current folder to where your dockerfile is. Execute this command
docker build -f Myproject.dockerfile -t myproject .
We need a -f parameter pointing to our dockerfile and -t is the tag (aka name) of our image. Image names have naming rules: stick to lowercase and dashes only.
After you run this command you should have a working image in your local repository. Lets test it out. Execute the following:
docker run -it --rm -p 8080:80 myproject
The parameters we passed are as follows:
-it – starts the container in interactive mode, so all output will be sent to the current console. Without this argument, containers are started in the background and we need to use docker stop command to terminate it.
--rm – remove the container after execution. Containers by default are left around after they exit (so anything that happened inside the container is preserved). For our scenario, we don’t need that and that just eats up disk space. Note this is different from image, which will still be preserved (think class vs object instance).
-p 8080:80 – map port 8080 on the host to port 80 inside container. You’ll often have issues mapping port 80 on the host, so I recommend picking something else.
The final argument is the name of the container image we want to start with.
Assuming you see no errors in the console, you should be able to hit the app now by pointing your browser to http://localhost:8080.
Sharing your image with others
Currently, your image sits in your local docker registry on your computer. If we want to share it with others we need to upload it to a container registry. The most common one used is Dockerhub. Head over to https://hub.docker.com and sign up for an account if you don’t already have one. After, come back to the command prompt and execute the following:
docker login -u <USERNAME>
Notice we didn’t specify the server. If no server is specified it just defaults to docker hub. Speaking of defaults, it’s worth discussing how docker image naming works. When we minted our image we gave it a name such as myproject. In the docker world, image names carry the URL of the container registry they belong to. So when we used an image like mcr.microsoft.com/dotnet/framework/sdk, it is not just the name of the image, it’s a full URL of where to find it. A server that hosts docker images is called a container registry (ex. mcr.microsoft.com), while the image that contains URL where to find it is synonymous with the word repository in the context of docker. There’s a special case though for Dockerhub. Any image that has a naming convention like <owner>/<image> is assumed to be living on Dockerhub, where the owner is the username. ANY other image registry will include a prefix (like mcr.microsoft.com). There’s one other thing you need to know about image naming: tags. All images have a “tag”, and if one is not specified it implicitly defaults to a tag called latest. Tags are specified via a colon after image name, so in fact, the image we created earlier is actually called myproject:latest. We can assign different tags to images, and they are most often used to differentiate between different versions or configurations of the same image.
Now that we got that out of the way, let’s get our image over to Dockerhub. First, we need to retag it to match our Dockerhub name. Execute the following:
docker tag myproject <MY-DOCKERHUB-USERNAME>/myproject
You’ve just created a new image. You now have two images in your local container registry:
- myproject
- <MY-DOCKERHUB-USERNAME>/myproject
As mentioned before, since images are just pointers to layers, they take up the same amount of disk space and are equivalent (until we change one or the other).
And now we can upload it to our remote registry by issuing a push command
docker push <MY-DOCKERHUB-USERNAME>/myproject
At this point, you should be able to find your image by heading over to https://hub.docker.com/r/<MY-DOCKERHUB-USERNAME>/myproject
Others can pull your image onto their computer just by calling
docker pull <MY-DOCKERHUB-USERNAME>/myproject
or pull and start with just one command like this
docker run -it --rm -p 8080:80 <MY-DOCKERHUB-USERNAME>/myproject
