

This post is intended to give a quick glance understanding of Azure’s App Service offering and it’s capabilities. App Service is an PaaS offering from Microsoft Azure, currently offering four distinct flavors:
- Web Apps
- Web app for Containers
- Mobile Apps
- API Apps
One important thing to realize about Azure App Services are based around VM orchestration, so in most scenarios a single application instance will be running on a dedicated VM. The exception to this rule is if you’re using web app for containers, you can provide a docker compose or a kubernetes pod definition to launch multiple containers on a single VM. This offering allows both vertical and horizontal scaling, although different price plans are limited to how many machines you can have per app.
App service exposes a single persistent drive where you deploy your application code, and this drive is mounted on to the file system of every VM backing your application. This drive’s size is tied to the service tier you pick for you app on the platform ranging from 1GB to 1TB. This drive will contain the web server root directory, the log files your application writes to drive, a shared storage your application can use to synchronize state across VMs, and in case of CI/CD configuration a copy of your source repository.
App Service is a fully managed offering, and supports both Windows & Linux based stacks and most of the common language runtimes that need to be installed at VM level. It has first-class support for ASP.NET, ASP.NET Core, Java, Ruby, Node.js, PHP, and Python.
Azure app service on Windows uses IIS as the web server, however you can configure applications with embedded web servers in a reverse proxy configuration. Your deployment must include a web.config file that will contain configuration for IIS on how to start your application including the start command. If you’re deploying a .NET app, it would have this file by default. When running on Linux there are more choices of server hosts based on the type of language you use, but the features on the Linux offering seem to be significantly more limited then on Windows version: this is also reflected in the price.
Deployment Methods
You have a few options for deploying your apps via a push model (manually)
- Visual Studio – you can publish application directly to Azure when building your app in Visual Studio IDE. This is covered in depth in my next blog post
- FTP upload – you can get a username that targets your app service site from azure portal and create a unique password for the FTP. When you connect to the FTP you will have access to the persistent volume that is attached to all the VMs that run your application. Navigating to /site/wwwroot/ will place you into the root of the webserver and this is where it will serve content from. This folder must contain web.config file that instructs IIS on how to bootstrap your app.
- Zip upload – each app service app comes with a Kudu management portal located at myappname.scm.azurewebsites.net/ZipDeploy where you can upload your deployment package through your browser
Continuous Delivery
An alternative to pushing your app manually, is to have Azure app service pull your application down when it is published to one of the supported cloud storage options. This allows you to create a simplified CI/CD pipelines. The ones that are supported include:
- OneDrive
- DropBox
- Visual Studio Team Services
- GitHub
- BitBucket
- External Repository – which can be either Git or Mercurial
- Local Repository
Azure App Service will monitor each of these sources for changes and automatically trigger a deployment when the sources change. When you connect one of these repo sources for automatic deployment, Azure will examine the types content in the repo and make reasonable assumption on how to deploy the app based on the detected file types it finds and create a deployment manifest. For example if it detects a *.sln or *.csproj, it will first attempt to do a standard .NET compile and publish. This is very similar to the buildpack model used by Cloud Foundry and Heroku. The process can be further controlled by including your own .deployment file in the root of your repo which can be used to point to a specific project if the repo contains multiple projects in subfolders. It can be further customized to invoke a shell script or PowerShell script to completely override the build and deploy instructions for your app.
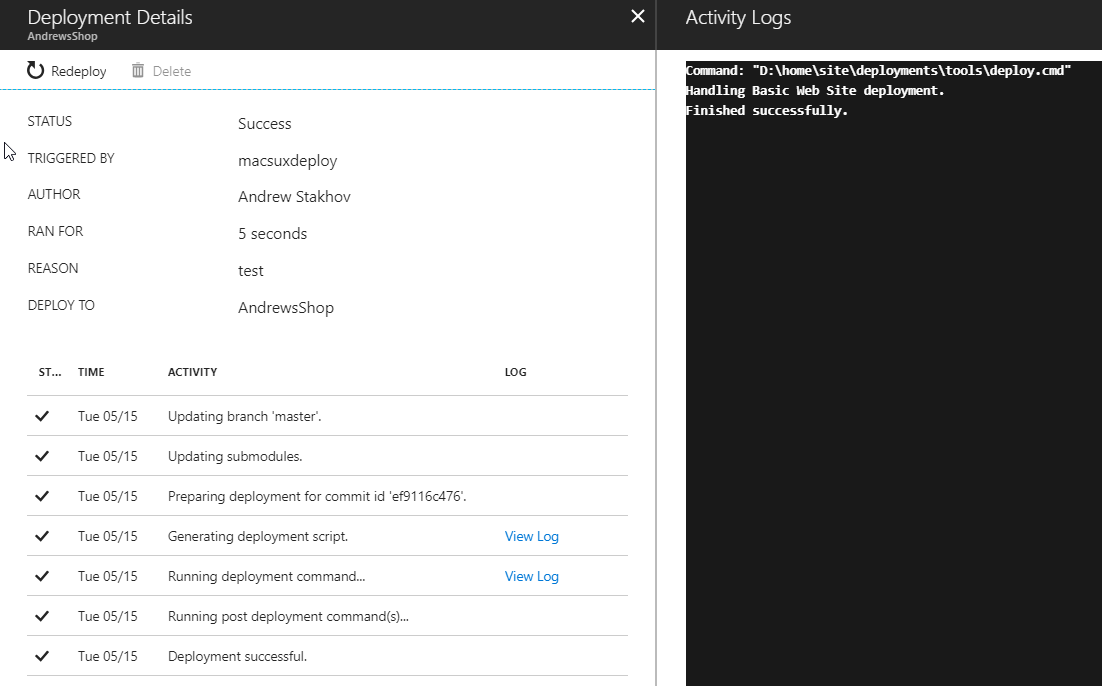 Azure will download your repository into /site/repository folder the application’s persistent drive and use .deployment instructions file to build and deploy your app into the /site/wwwroot folder. For simplified sites that can run directly off content of source repo (ex. static website), it’s also possible to map git checkout directory to go directly into the web server root directory so no deployment or copying of files is required.
Local repository option is worth special mention. This will create a Git remote repository on Azure mapped a folder on persistent drive, and you can get the URL for this repo in you’re app’s overview page. When new commits are pushed to this repo, Azure will automatically trigger a deployment. This is a great option as all you have to do is configure a remote endpoint for your git project and every time you push it will trigger a deployment.
Blue/Green deployments
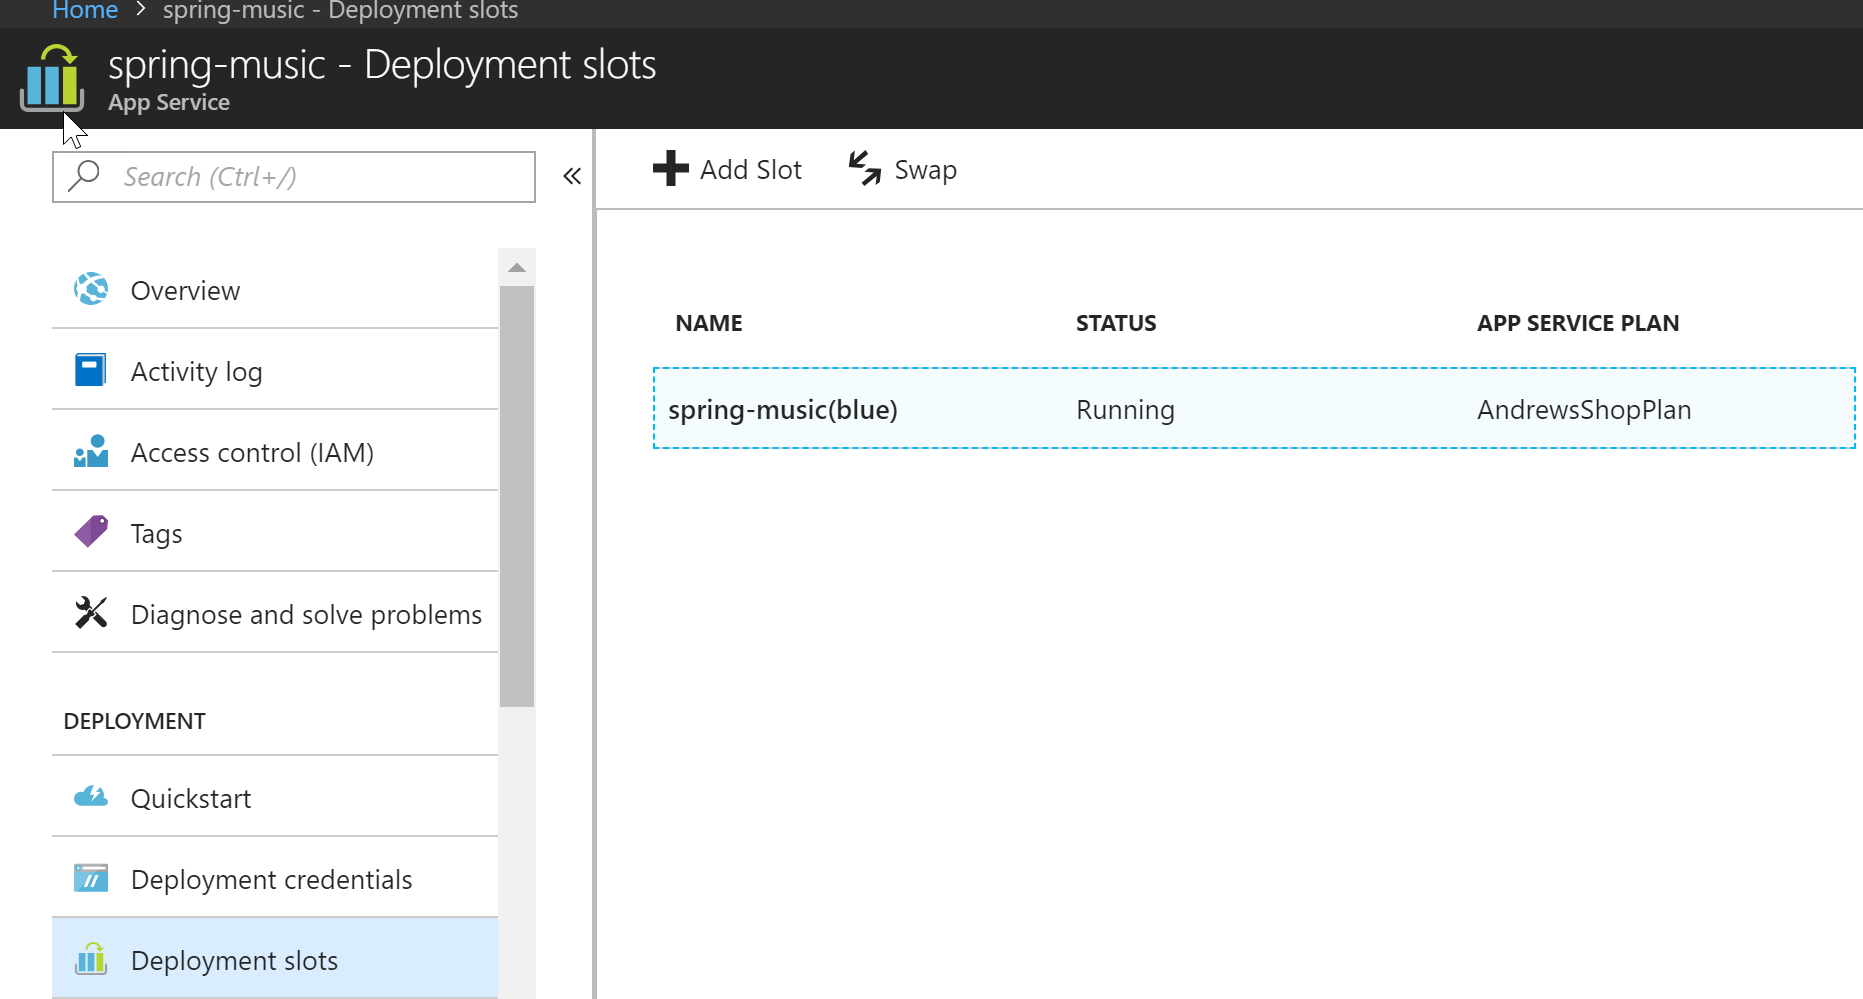 App service has a concept called deployment slots. These are treated as individual app instances with their own VM and settings, nested under your main app. Each deployment slot has it’s own URL and deployment credentials. It also maintains it’s own unique settings, such as connection strings and runtime frameworks. Once you deploy to a deployment slot, you can swap it into the main production slot. It’s worth noting that deployment slots are only available with standard and premium tiers, however they don’t have a price associated with it. Deployment slots are also limited to a single VM so you will not be able to scale these out beyond a small number of users. Having said that, App Service does have a feature called “Testing in production” that allows you to direct a percentage of traffic towards one of the deployment slots. This allows you to get toes wet with a new release by exposing it to a small number of users.
Advanced troubleshooting with Kudu
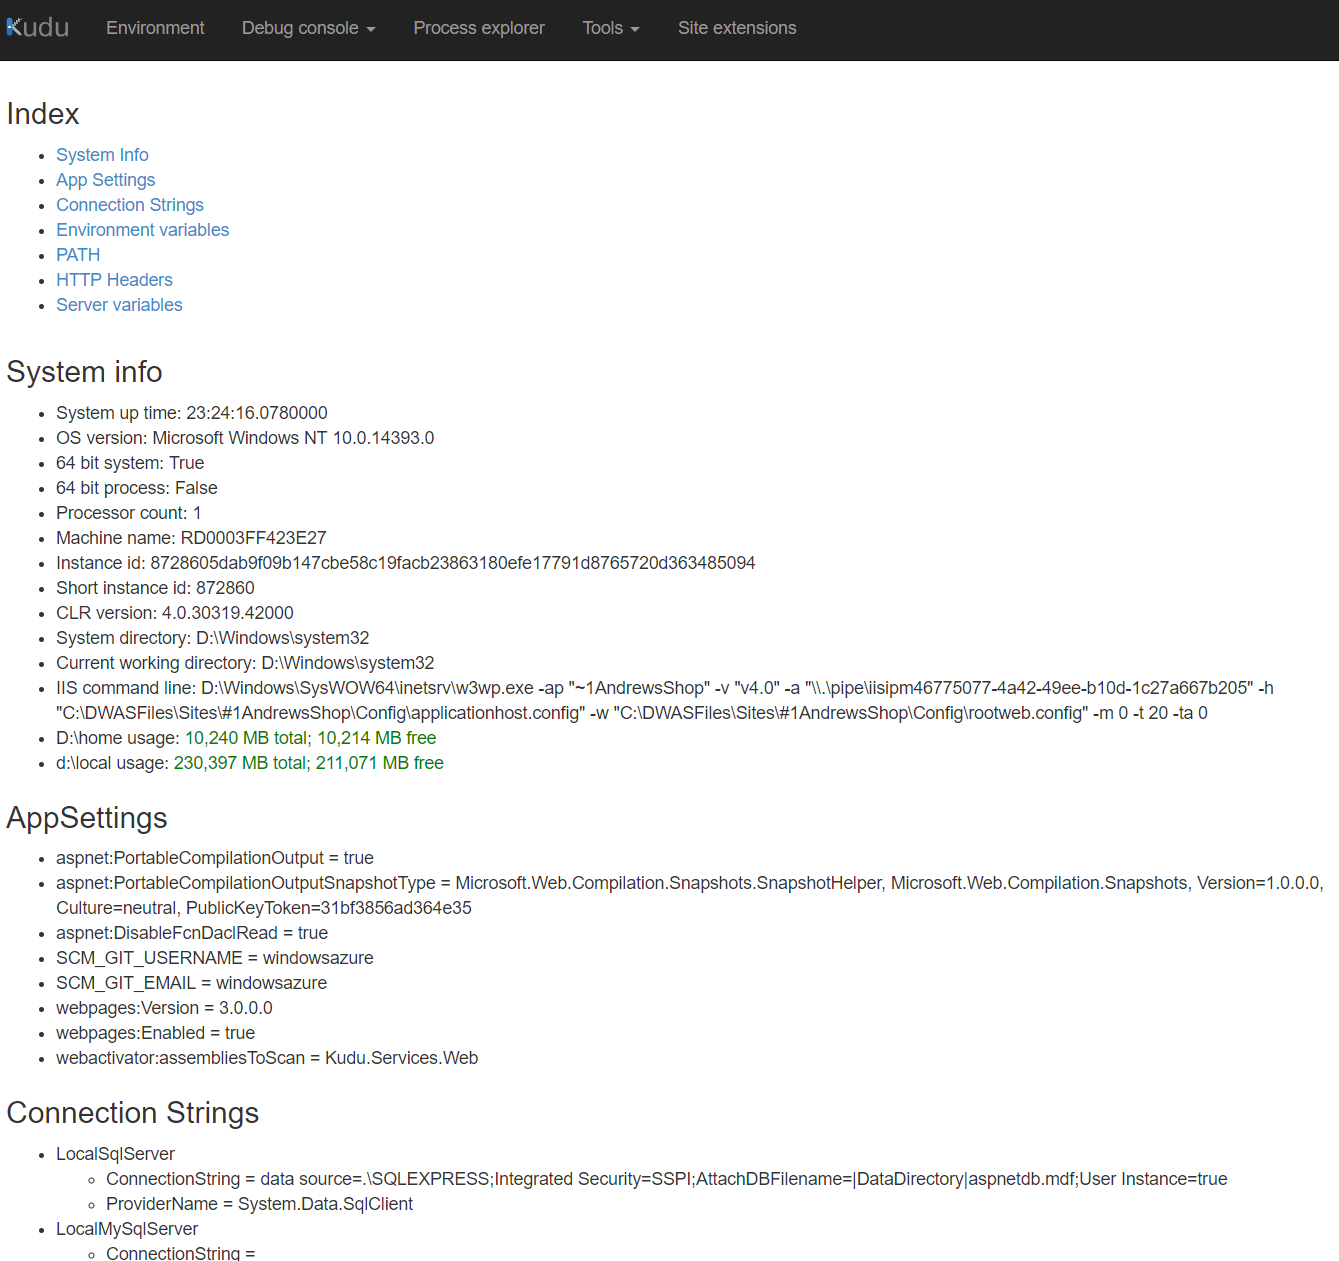 Kudu is an interesting diagnostics portal that is specific to each app and is enabled for all services running on Azure App Service. It is available by browsing to websitehostname.scm.azurewebsites.net or by selecting “Open in Kudu” option when right clicking on the service in Visual Studio. The portal is secured by access permissions associated with your azure account and includes an impressive array of tools to help troubleshoot the app. Much of the information is similar to what is provided by Spring Actuators. Inside this portal I was able to view application settings, including environment variables, config file settings, and OS level information.
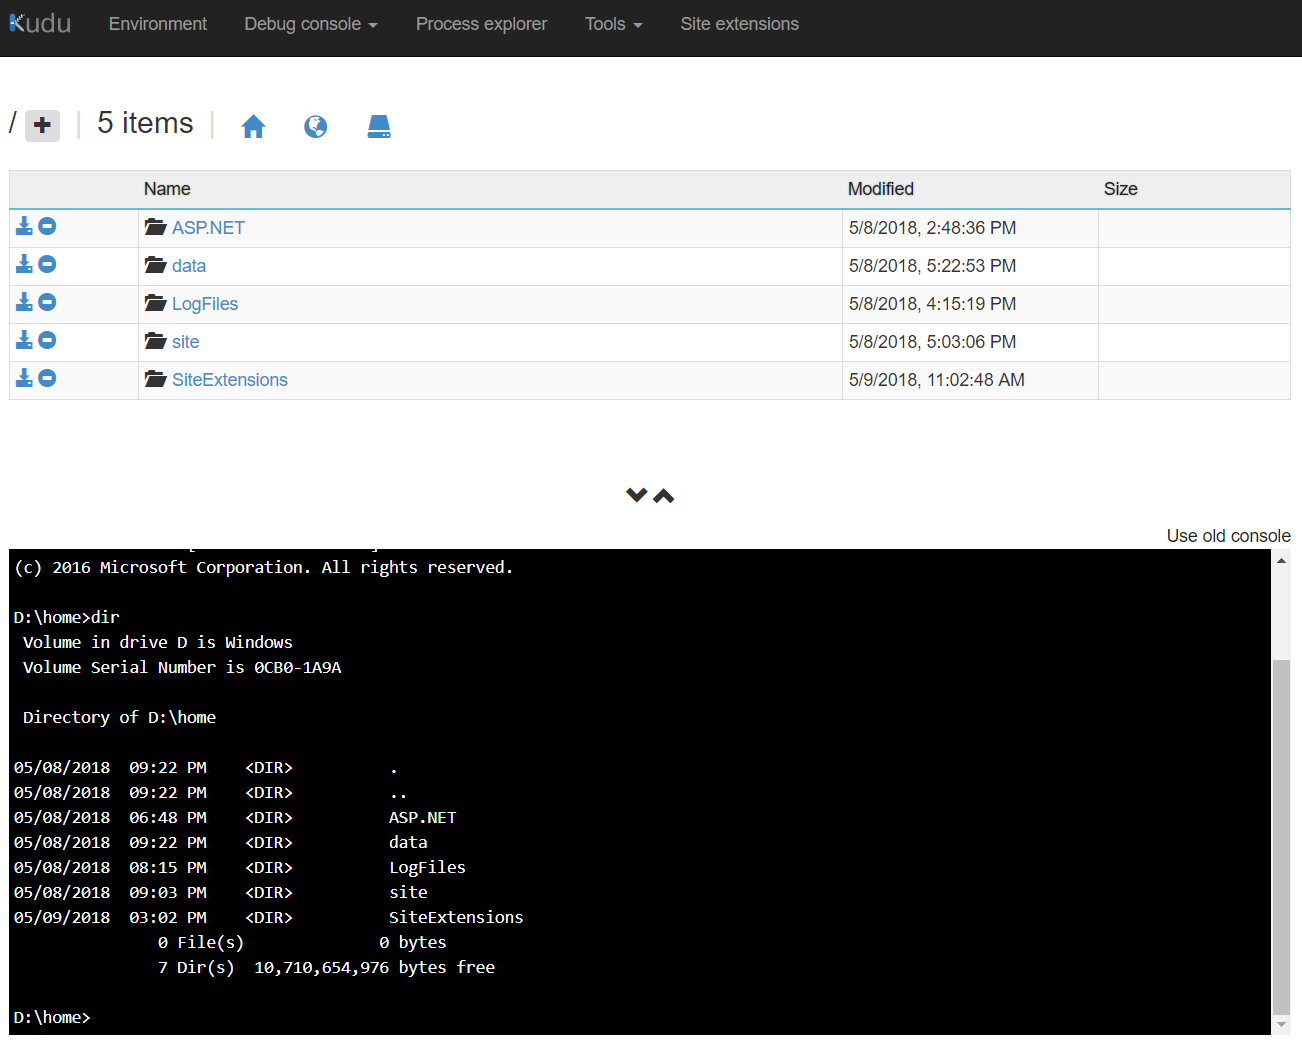 What i found really interesting is the Debug Console which allowed me to attach to enter shell inside the VM. For Windows VM shell came in two flavors: CMD & PowerShell. This also came with integrated file browser which allowed me to look at my file structure, download individual files and delete them.
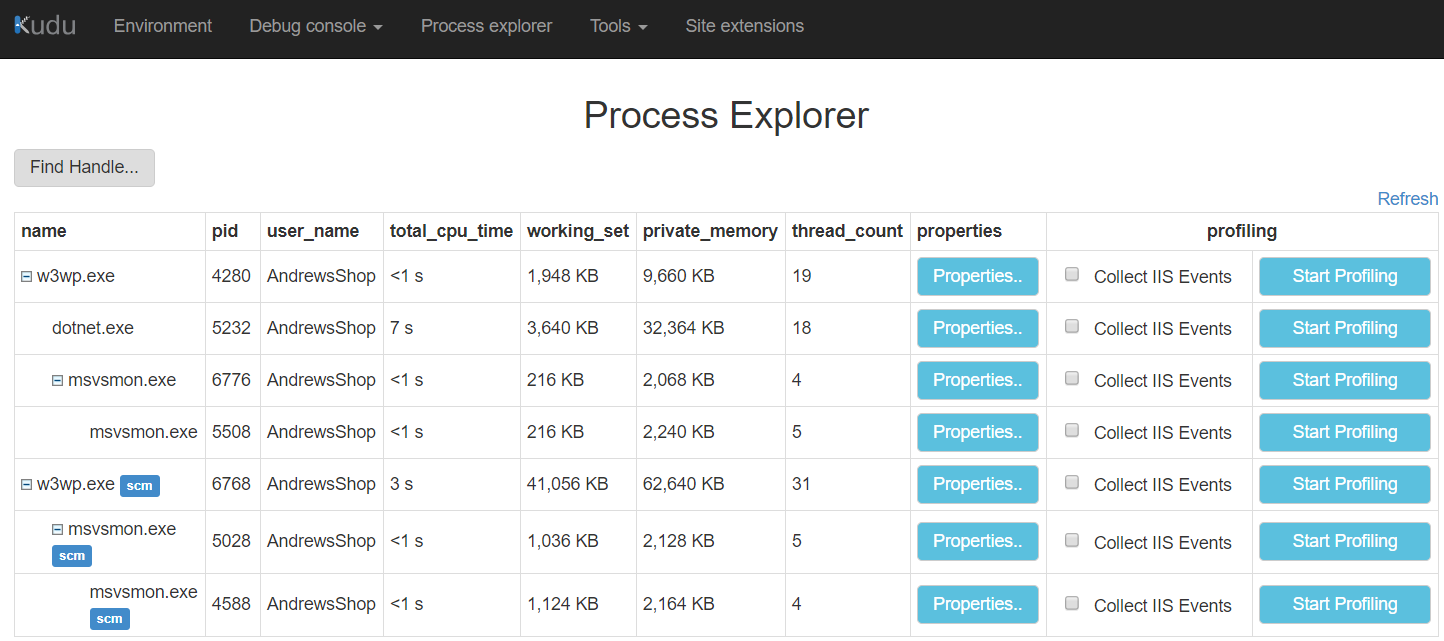 Process explorer allowed me to see a list of processes running on the VM, but in addition see CPU, memory, environmental variables, thread information and more per process.
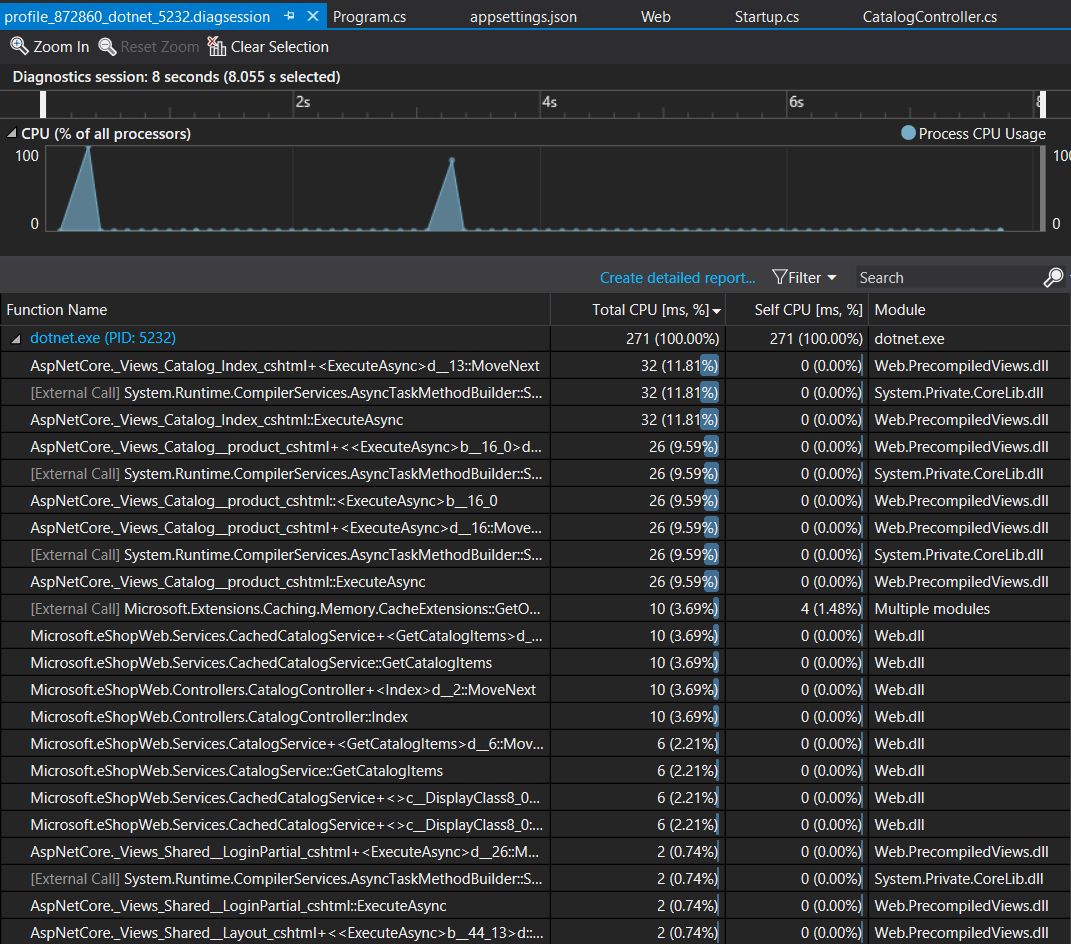 What is really impressive is there’s an option to profile a process. This started a profiling session until I clicked a stop button. At this point my browser downloaded a .diagsession package which could be opened with Visual Studio which allowed me to see profile results and quickly pinpoint the parts of my app with the biggest bottleneck.
Kudu portal also has a section that allows managing site extensions which and offers an impressive catalog of add-ons that can influence the behavior of your app. This includes things like APM agents from common vendors like New Relic & App Dynamics, Let’s Encrypt integration to install and automatically renew SSL certs for your site, Auth0 security, Log forwarder to Splunk, and many others. Site extensions are managed by a curated feed managed by Microsoft, and allow building and publishing your own which can be seen at https://www.siteextensions.net/packages. At the time of writing, there are currently 81 extensions available.
Routing
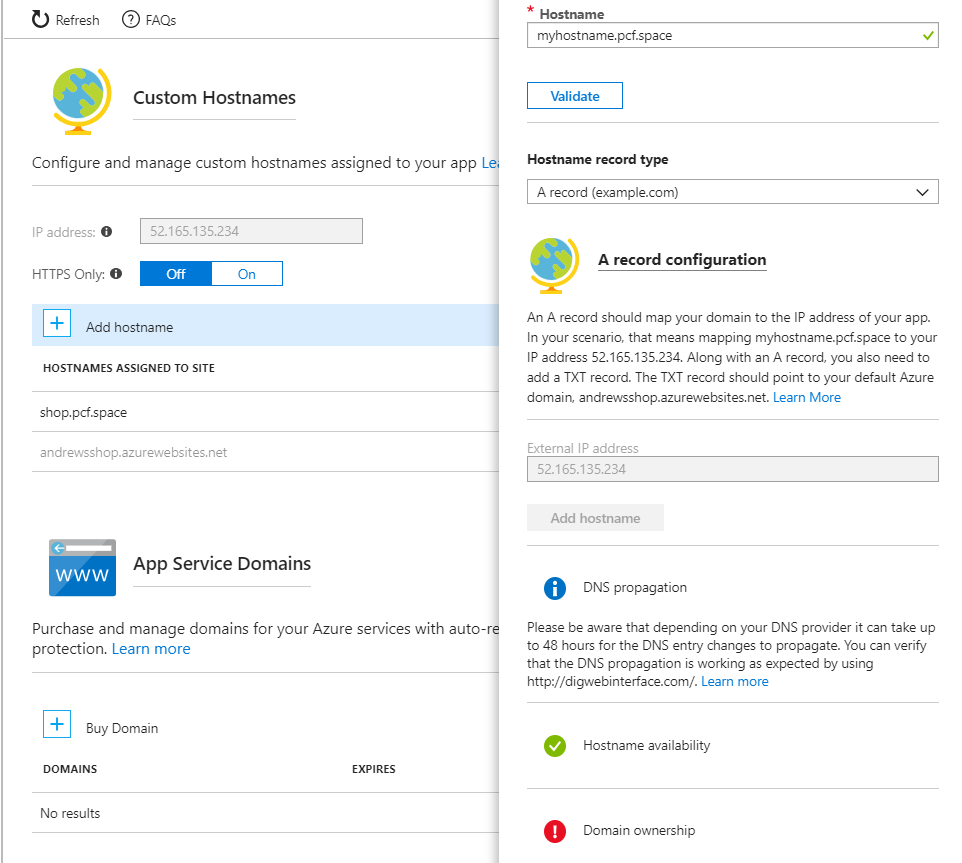 When you publish your application, it is assigned a hostname that maps to *.azurewebsites.net subdomain. It will validate that the hostname is available before you publish your app. Your app is also assigned a static virtual IP address, but it is not exclusive to your app so Host header is still used for routing. After the app is published, you can create more hostname mappings to custom domains by using either A or CNAME DNS mapping. Azure will also verify that you’re the owner of the domain by verifying the DNS records match. While it is possible to change additional hostnames, it seems that the original hostname you picked at azurewebsites.net cannot be removed or changed.
SSL
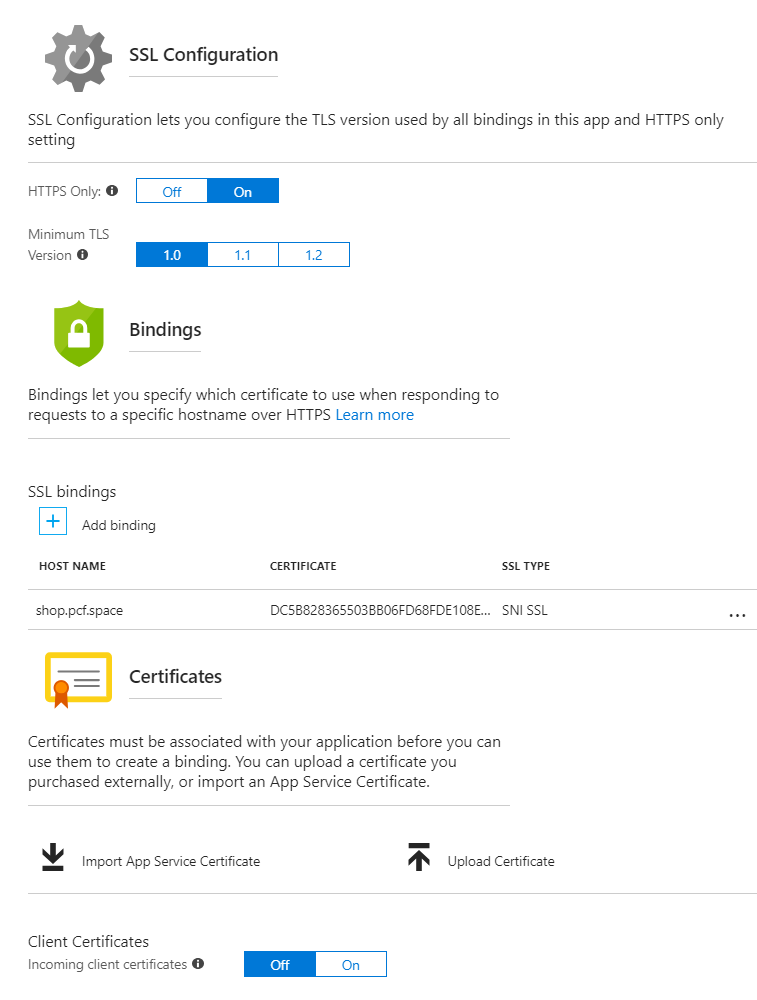 You can force all traffic to use HTTPS to automatically redirect any HTTP requests and establish the minimum TLS version you want to support. Hostnames that are accessed under the azure generated subdomain (*.azurewebsites.net) are automatically assigned a wildcard cert signed by Microsoft’s own root CA. Any additional hostnames that you mapped will require custom certs to be mapped. The portal allows you to upload your certificates in PFX format. After certificate is added, you can bind hostnames to compatible certs using either SNI or IP Based SSL. You can also enable option to pass incoming client certificate all the way to the app if you wish to do mutual authentication via certs.
Application Security
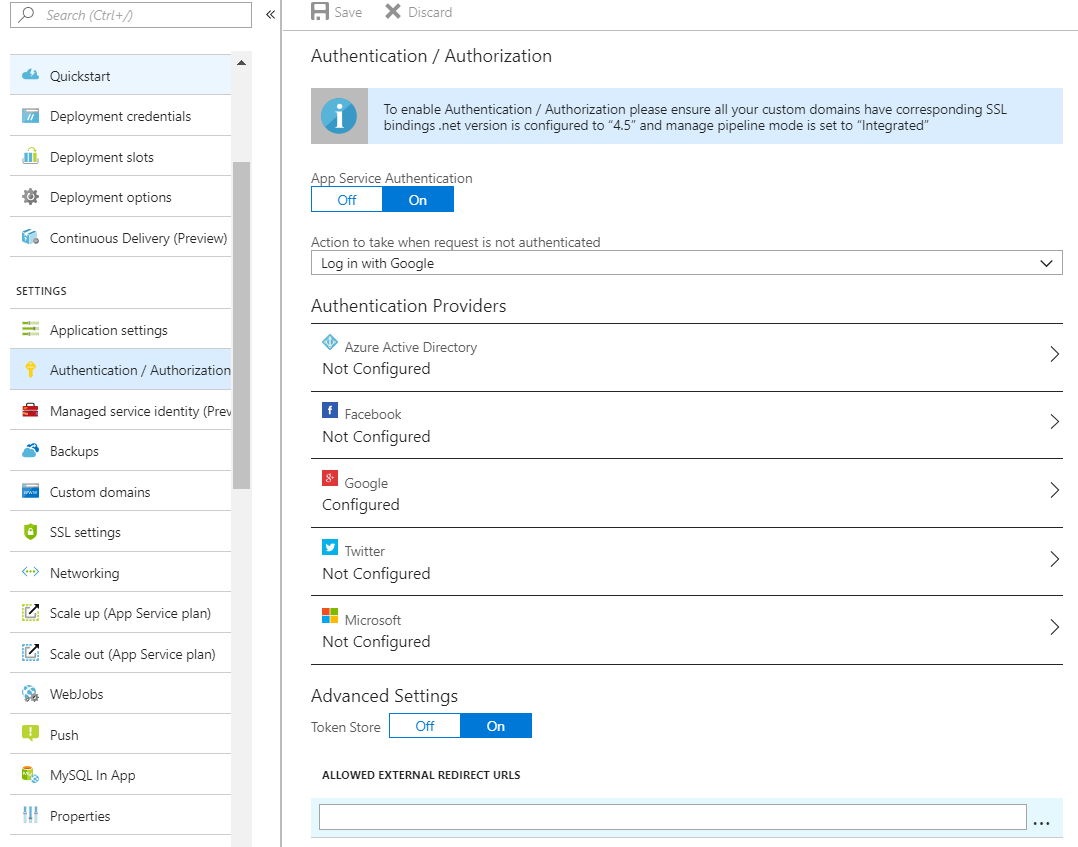 Azure allows you to secure your app using common cloud authentication providers. This is a great way to wrap an app without security using platform level features. The supported identity providers includes Facebook, Google, Twitter, Microsoft and Azure Active Directory. I have configured Google authentication by creating ClientID / Secret in GCP console, and configuring my site to log in with Google. After this attempts to access my site redirected me to Google to be logged in.
For authorization, Azure will inject special HTTP headers into your app that will contain values in the IDP token claims. This will allow your application to make simple authorization decisions without taking on any special security libraries. What I found really interesting is that if you’re doing .NET, the Principal object will be automatically populated when those headers are present.
WebJobs
WebJobs allows you to upload an executable or a script to be run on demand. The following file types are supported:
- .cmd, .bat, .exe (using Windows cmd)
- .ps1 (using PowerShell)
- .sh (using Bash)
- .php (using PHP)
- .py (using Python)
- .js (using Node.js)
- .jar (using Java)
WebJob can be triggered through Azure portal or by hitting a webhook endpoint to trigger a run. The webhook endpoint is secured with a generated username/password. The job can be configured to run either on all the VMs in the scale set, or just a single instance. It’s also possible to have the job run on schedule by attaching a CRON expression to it. The shell output of the job runs is captured and exposed via Kudu management portal. One limitation I found is it doesn’t seem to be possible to pass parameters into the job or to upload more than a single file. A workaround would be to upload the executable you want to run to the shared mount drive and have a shell script call into it which includes all the necessary parameters.
Performance Tests
 You can schedule a performance test against your app to see how it behaves under load. You can define the location (geographic region) from which the traffic will be directed to your site from, user load and duration. The configuration allows you to either hit a predetermined URL, or for more advanced cases upload a Visual Studio web test project file (*.webtest) that allows much greater control over the invocation pattern. After the stress test is complete, the results can be accessed inside Azure portal for analysis.
Price / Features
The pricing for App Services is divided into tiers, with each tier allows access to more features and greater ability to scale. On the bottom end of the spectrum we have a free and shared offering which is great to get feet wet with the platform, but are restricted to just a single VM backing your application. In the middle we have Basic, Standard and Premium tier which will give you access to install custom SSL certificates (the default one is only issues for *.azurewebsites.net domain), and Standard and above gives access to deployment slots. One other important caveat is that all app service instances including deployment slots are publicly visible for all tiers except Isolation, which means if someone knows the URL for your dev/staging environments they can access them. Even when running in Isolation mode it doesn’t seems like you can do private routing on some hosts and not others. This feature is potentially important to enterprises looking to minimize the footprint of resources available from public internet to only those officially published as production.
A brief snapshot of the pricing per month is as following, though I suggest reviewing Microsoft’s own full price/features grid to better understand the price/feature spectrum.
- Shared: $9.49
- Basic: $54.75
- Standard: $73.00
- Premium: $146.00
- Isolated: $292.00 per VM + $1,128.36 for isolation environment